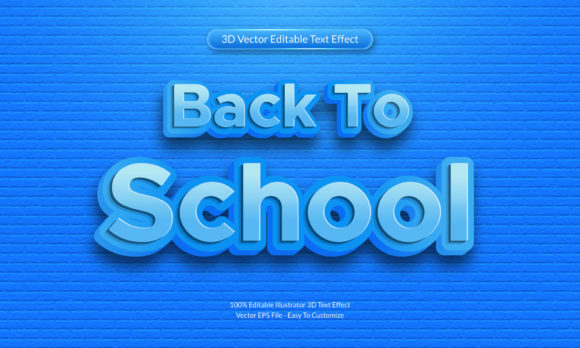
Back to School 3D Text Effect Design: A Practical Guide to Getting It Right
If you have spent any time browsing design marketplaces or social media feeds in late summer, you have likely noticed a surge in Back to School 3D Text Effect Design assets. These are layered, dimensional lettering styles that give words like Welcome, Learn, or Class of 2025 a playful, pop-out appearance. They appear on flyers, social media graphics, classroom posters, product packaging, and even apparel mockups. The appeal is understandable: a well-crafted 3D text effect makes ordinary words feel energetic and memorable. But the gap between a good result and a disappointing one often comes down to how you choose, apply, and evaluate these designs. Let us walk through what actually matters, what commonly goes wrong, and how you can avoid the pitfalls that trip up everyone from eager beginners to seasoned creators.
Why Back to School 3D Text Effect Design Deserves a Closer Look
At its simplest, a 3D text effect adds depth, shadow, and dimension to flat lettering. In the context of back-to-school projects, these effects often incorporate bright color palettes, playful extrusion angles, and subtle textures that evoke notebooks, chalkboards, or pencil shavings. People gravitate toward them because they instantly signal a theme without requiring custom illustration work. You can download a layered PSD file or a set of vector styles and drop in your own words within minutes. That convenience is powerful, but it also creates a false sense of simplicity. Many users assume that because the asset looks polished in a preview, it will perform flawlessly in their specific project. That assumption is where trouble often begins.
The real value of a Back to School 3D Text Effect Design lies not in how flashy it appears on a product page, but in how well it adapts to your actual layout, color scheme, and output medium. A design that looks crisp on a monitor at full zoom may become muddy when printed on a flyer at 50% scale. A style that relies on heavy drop shadows may conflict with a busy background image. Understanding these dynamics before you commit to a purchase or a final file is what separates a satisfying outcome from a frustrating redo.
Overlooking Font Compatibility and Editability
One of the most frequent missteps is assuming that any 3D text effect works with any font. Many downloadable effects are built around a specific typeface, and when you swap in a different font, the depth, bevel, and lighting break. You end up with letters that look distorted or misaligned. Always check whether the asset uses live text layers with layer styles, or if it has been rasterized and flattened. If you need to edit the words later, you want something that remains editable. For example, a PSD file with smart objects or a fully vector effect in Adobe Illustrator lets you change the text without rebuilding the 3D effect from scratch. A flattened PNG or JPEG gives you no flexibility, so you must get the words right on the first try.
Ignoring the Background and Context
A 3D text effect that pops beautifully on a neutral gray background can disappear into a busy classroom photo or a patterned notebook cover. The shadow and highlight layers that give it depth rely on contrast. If your background shares a similar value to the shadow or highlight, the dimension flattens out. Before applying any effect, place a test version over your actual background and check visibility at different export sizes. Light effects with soft drop shadows tend to work well over darker backgrounds, while bold, chunky effects with hard shadows are safer on lighter or simpler backgrounds. Do not rely solely on the preview image from the marketplace. Create a quick mockup yourself.
Choosing Style Over Readability
It is easy to get drawn into elaborate designs with multiple extrusions, bevels, reflections, and texture overlays. But if your audience squints to read the word, the design has failed. Back-to-school communication often needs to convey dates, event names, or calls to action quickly. A text effect that sacrifices legibility for spectacle will frustrate readers and weaken your message. Stick with effects that keep the letterforms recognizable, even at smaller sizes. If you are creating a poster for an open house or a social media graphic for a supply drive, test the text at the actual viewing distance. If it blurs or becomes hard to parse, simplify the effect or increase the font weight before finalizing.
Evaluate the Asset Across Multiple Use Cases
Before you download or buy a Back to School 3D Text Effect Design, imagine it in three different scenarios: a social media square at 1080 pixels, a letter-sized flyer at 300 DPI, and a website header. Does the effect hold up in each? Are the details refined enough for close-up viewing and still clear when scaled down? If the design relies on fine textures or thin highlight lines, it may disappear at smaller sizes. Look for assets that include multiple resolution options or that use vector layers so you can scale without quality loss. Many experienced designers keep a shortlist of effects that work reliably across formats and reach for them repeatedly rather than chasing a new look for every project.
Customize Colors to Fit Your Brand or Theme
Most 3D text effect packs come with preset color schemes, but you are not locked in. The best assets give you control over the main color, shadow color, highlight, and extrusion. Take a few minutes to adjust these to match your school colors, event theme, or brand palette. A generic red and blue effect might be fine, but a tailored navy and gold that matches your school district creates a cohesive, professional look. If the asset does not offer easy color control, consider whether the preset colors are versatile enough for your needs. You do not want to purchase something that forces you into an awkward color compromise.
Use Layer Organization to Your Advantage
When working with layered PSD or AI files, keep the organization intact. Rename layers, group them logically, and avoid merging them unnecessarily. This discipline pays off when you need to tweak the lighting angle, adjust the depth, or swap in a new word later. A well-organized file makes your work faster and reduces the chance of accidentally breaking the effect. If the asset comes with a messy layer structure, spend a few minutes cleaning it up before you start editing. That upfront investment saves much more time than hunting through nameless layers later.
What to Check Before You Buy or Download
Before you commit to any Back to School 3D Text Effect Design, examine the product page for clear documentation about software requirements. Does it require a specific version of Photoshop or Illustrator? Is it compatible with Affinity or Canva? Some effects only work with non-destructive layer styles, others depend on specific plugins or actions. Knowing this upfront prevents compatibility surprises. Also, look for user reviews that mention scalability, ease of editing, and real-world usage. A product with dozens of positive reviews that mention practical applications is far more trustworthy than one with only generic praise.
Check the license terms as well. Some assets are restricted to personal use only, while others allow commercial use in printed materials, merchandise, or digital products. If you are a small business owner creating sellable items like T-shirts or planners, you need a commercial license. Misusing a restricted asset can lead to takedown notices or fees. Read the fine print and keep a copy of the license in your project folder.
Practical Examples of Smart Application
Consider a teacher preparing a bulletin board for the first day of school. They choose a 3D text effect that looks like chunky crayons. The preview shows bright primary colors with a slight texture. In practice, the texture makes the letters hard to read from across the room. A better choice would be a smoother, bolder effect with high contrast against the bulletin board background. Alternatively, a freelance designer creating social media graphics for a school district can use a single 3D text effect pack for all posts: a consistent depth style with adjustable colors. That consistency builds brand recognition and reduces design time for each new post. By vetting the effect on one or two templates first, the designer avoids committing to a style that does not translate well to Instagram Stories or Facebook banners.
Another common scenario involves a parent volunteer making a fundraising flyer. They find a free 3D text effect online, but the file contains rasterized text that cannot be edited. They try to erase the old word and type over it, but the effect breaks. The result looks unfinished and unprofessional. A better approach is to use a template that keeps the text as a live layer, or to recreate the effect using a simple layer style with bevel and shadow settings that can be saved as a preset for future use.
Staying Focused on What Works
Back to School 3D Text Effect Design can be a genuine time-saver and a creative boost when chosen thoughtfully. The key is to prioritize flexibility, readability, and compatibility over pure visual flash. Check how the asset handles real-world backgrounds, different fonts, and various output sizes. Organize your files so you can reuse and adapt the effect later. And always match the style to the context, not the other way around. By applying these practical checks and corrections, you will produce work that looks professional, communicates clearly, and holds up across every medium your audience encounters.